Additionally, we also need a Hadoop package, so open a different browser and search for archive.apache.org. You can install it with the following command:(adsbygoogle=window.adsbygoogle||[]).push({}); Once installed, you can verify the installed version of Java with the following command: First, create a new user named hadoop with the following command: Next, add the hadoop user to the sudo groupusermod -aG sudo hadoopif(typeof ez_ad_units!='undefined'){ez_ad_units.push([[580,400],'howtoforge_com-medrectangle-4','ezslot_1',108,'0','0'])};if(typeof __ez_fad_position!='undefined'){__ez_fad_position('div-gpt-ad-howtoforge_com-medrectangle-4-0')}; Next, login with hadoop user and generate an SSH key pair with the following command: Next, add this key to the Authorized ssh keys and give proper permission: Next, verify the passwordless SSH with the following command: Once you are login without password, you can proceed to the next step. This will allow you to give settings to set up your first Ubuntu machine. Create a link, change the ownership, and update the bashrc. Click on Next and choose Create a virtual hard disk now. First, log in with hadoop user and download the latest version of Hadoop with the following command: Once the download is completed, extract the downloaded file with the following command: Next, move the extracted directory to the /usr/local/: Next, create a directory to store log with the following command: Next, change the ownership of the hadoop directory to hadoop:Advertisement.banner-1{text-align:center;padding-top:10px!important;padding-bottom:10px!important;padding-left:0!important;padding-right:0!important;width:100%!important;box-sizing:border-box!important;background-color:#eee!important;outline:1px solid #dfdfdf;min-height:285px!important}if(typeof ez_ad_units!='undefined'){ez_ad_units.push([[250,250],'howtoforge_com-banner-1','ezslot_9',111,'0','0'])};if(typeof __ez_fad_position!='undefined'){__ez_fad_position('div-gpt-ad-howtoforge_com-banner-1-0')}; Next, you will need to configure the Hadoop environment variables. You need to remember to create the directory mentioned in the config files. Then say yes and enter your password. Then, activate the environment variables with the following command: In this section, we will learn how to setup Hadoop on a single node. You can download it with the following command: You can now verify the Hadoop version using the following command: Next, you will need to specify the URL for your NameNode. This should download your Java-related tar file. Choose your language and continue. sudo tar -xvf /home/hdc/Downloads/hadoop-2.6.5.tar.gz // Hadoop related tar file which you want to unpack. At times you might face an issue of not finding the Ubuntu (64-bit) option, and in such a case, you'd have to enable virtualization in your BIOS settings. Wait until both your machines are set up. Firstly, download some packages for both machines so they can be used for a Cloudera cluster. When you look at the first machine, it will ask you to remove the installation medium, so click on Enter. Post Graduate Program in Data Engineering. Once this is done, we have two machines that can not only ping each other but also connect through ssh with each other. On the second machine, we'll have a DataNode, NodeManager, and SecondaryNameNode running. Once that is done, save it. Once the above steps are performed, you'll have Java installed on the machine. Perform the following steps on your machine one, while you're logged in as hdc: Go back to machine two, and check if your Java and Hadoop versions are shown correctly: Now we have two machines which have Java and Hadoop packages, and these can be used to set up the Hadoop cluster once we start editing the config files found in the below path on both machines: Now we're ready to bring up our two-node cluster for Hadoop. You can choose the option of dynamically allocated, which means as you store data on your disk, it will be using your parent disk storage. The type: cd jdk1.8.0_201/bin/ // Change directory. After this step, fill in your credentials. Once it's set, then you can start configuring your machine. Now we need to install Java on the second machine by copying the tar file from the first. After this, we copy the files to m2 and edit it on m2 as well. Currently, she is learning the Japanese language. Go through the same steps for the second machine, as well. After performing the above steps, you'd have to wait for a while until the pop up asks you to restart the machine. So now we have to navigate to the second machine and generate an ssh key on it.  Once this is done, you'll have a Hadoop directory created under user local. drill install drillbit ubuntu apache zookeeper
 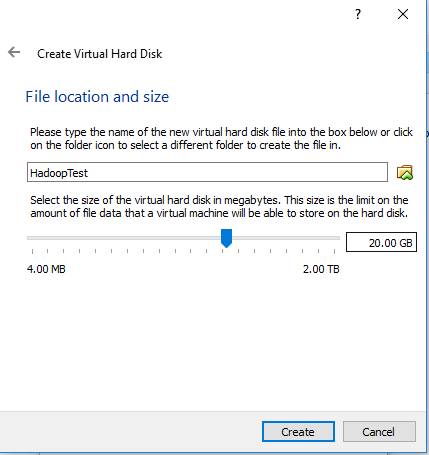 You can set up the two machines individually or by cloning, as well. The core and mapped files don't need any changes. Then the 'jps' gives only '5428 Jps'. Then perform similar steps as you did on machine one and unpack Hadoop. This also creates a ssh key which has a public and private key. You can now start exploring basic HDFS commands and design a fully distributed Hadoop cluster. how to design a fully distributed Hadoop cluste, [emailprotected]:~$ hdfs dfs -mkdir /test mkdir: Your endpoint configuration is wrong; For more details see: http://wiki.apache.org/hadoop/UnsetHostnameOrPort, so thanks :) because of this post, i installed hadoop, Hi, I did steps till hdfs namenode -format. PMP, PMI, PMBOK, CAPM, PgMP, PfMP, ACP, PBA, RMP, SP, and OPM3 are registered marks of the Project Management Institute, Inc. Remember that both machines don't have Java and other packages installed, so let's start installing packages now. Here on machine one, we'll have a NameNode, DataNode, ResourceManager, and a NodeManager running. So you will need to install Java in your system. ls jdk1.8.0_201/bin // Displays the Java related programs. Congratulations, you have just set up your Hadoop cluster on Ubuntu! hadoop mentors Click on Storage, then click on Empty, and from the drop-down on the right side you can select your disk image which you'd have already downloaded. Once again, you'd have to click on create, so now you've given the basic settings for your machine. You can do it with the following command: Once your system is updated, restart it to implement the changes. The same thing applies to the second machine, so let's click on machine 1 and set it up. *Lifetime access to high-quality, self-paced e-learning content. You should see the following screen: Congratulations! you have successfully installed Hadoop on a single node. You need to scroll down and select a few properties as we're setting up a simple cluster. Then click on Storage/Empty and choose the disk image. This feature is only available to subscribers. Her hobbies include reading, dancing and learning new languages. The screen will look like this: The third file will be the hdfs-site file, which tells the replication factor, where the NameNode stores metadata on disk, and so on. After this, go to the second machine and create a directory. After this, download the Hadoop-related tar file by clicking on Hadoop-2.6.5.tar.gz. Once the steps below are performed, the hadoop cluster is set: But before we can start using the cluster, we have to do formatting to create the initial metadata in the metadata path by using the following command: It's advised not to perform formatting more than once. After this, go to the GitHub site and perform the same steps. hadoop install windows say You can do it by editing core-site.xml file: Save and close the file when you are finished: Next, you will need to define the location for storing node metadata, fsimage file, and edit log file. Click Next, and now you must give the size of the hard disk. My skills include a depth knowledge of Redhat/Centos, Ubuntu Nginx and Apache, Mysql, Subversion, Linux, Ubuntu, web hosting, web server, Squid proxy, NFS, FTP, DNS, Samba, LDAP, OpenVPN, Haproxy, Amazon web services, WHMCS, OpenStack Cloud, Postfix Mail Server, Security etc. After you click on the above link, your screen will look like this: Once you've downloaded the Oracle VM box and the Linux disc image, you're ready to set up machines within your virtualization software, which can then be used to set up a cluster. You can do it by editing hdfs-site.xml file. A root password is configured on your server. You'll see an option that says to try Ubuntu or install Ubuntu go ahead with the installation of Ubuntu distribution of Linux for the machine. Once you have the zip file downloaded, unzip it so you can set up a single node Cloudera cluster. The same things must be repeated on machine two, but before that, we have to set up a password across both machines. Now choose Dynamically allocated, click on Next to give the size of the hard disk, and click on Create. Big data, as the name suggests, is a data set that is too massive to be stored in traditional databases. This process should have copied your public key. Select that and click on Install Now. We're copying the config files from GitHub. So, how do you install the Apache Hadoop cluster on Ubuntu? Remember to set up your machine as smoothly as possible, so setting up the cluster becomes easy. After this, in the next step, you need to choose VMDK and click on Next. From the various options that will be displayed, you can choose a stable version by accepting the license agreement. Here, config files are updated on the GitHub link. You should see the following screen: To access the YARN Resource Manager, use the URL http://your-server-ip:8088. Since we plan to run two DataNodes, we're going for two replications. She works on several trending technologies. Once the Java setup is complete, you'll need to untar the Hadoop-related directory. It uses a distributed file system (HDFS) and scale up from single servers to thousands of machines.if(typeof ez_ad_units!='undefined'){ez_ad_units.push([[728,90],'howtoforge_com-box-3','ezslot_7',106,'0','0'])};if(typeof __ez_fad_position!='undefined'){__ez_fad_position('div-gpt-ad-howtoforge_com-box-3-0')}; Apache Hadoop is based on the four main components:if(typeof ez_ad_units!='undefined'){ez_ad_units.push([[728,90],'howtoforge_com-medrectangle-3','ezslot_6',121,'0','0'])};if(typeof __ez_fad_position!='undefined'){__ez_fad_position('div-gpt-ad-howtoforge_com-medrectangle-3-0')}; In this tutorial, we will explain how to set up a single-node Hadoop cluster on Ubuntu 20.04. If everything is fine, you should be able to check the Hadoop version: Hadoop version // To check the Hadoop version. notepad install desktop ubuntu installation javatpoint shortcut completed editor created process access been Big Data is a term that goes hand in hand when it comes to Hadoop. For all of you first-time readers, let's brief you on Hadoop before we get started on our guide to installing Hadoop on Ubuntu. ssh-keygen -t rsa -P "// Sets up a ssh key. Shown below are the important config files that we need to update: Go to machine one and type the following: As seen above, the first config file that is updated is the core-site file. Now you need to copy the public key from machine one to two and vice versa. Once you hit enter, you'll see that there is no specified configuration. This is how you can parallelly set up two machines, and once the machines are set you can then install relevant packages and Hadoop to set up the Hadoop cluster. Here, we've provided 20 GB as it will be more than sufficient for machines that will be hosting the Apache Hadoop cluster. Then I started one by one. Go back to machine one, and wait for the utilities to come up. Get your subscription here. Here, we're choosing Hadoop-2.6.5/. Meanwhile, you can download the Cloudera QuickStart VM by looking for it on Google. Here, 1.5 GB is chosen. Once this is done, repeat the steps, click on settings, choose System/Processor, and give it two CPU cores. Repeat the same command for the second machine by replacing hdc@m2 with hdc@m1. Before starting, it is recommended to update your system packages to the latest version. Do the same process for the second machine as well. In addition to this, you need to disable the firewall by typing: Similarly, use the same command for machine two. Learn more about other aspects of Big Data with Simplilearn's Big Data Hadoop Certification Training Course. After this, in the next step, you'd need to choose VMDK and click Next. Now let's look at the m1 machine, which will slowly come up, and your screen will show the dialogue, "Connection Established." Then choose Download updates while installing Ubuntu, click on Continue, and then you'll see an option which says Erase disk and install Ubuntu.
  Here, we've shown how to do it individually. This will start your machine.
  You can do this without logging into machine two and by following these commands: You can look into the various files and see which file needs changes. After choosing the specifications mentioned above, click Next. Copy the various properties and paste them on the terminal. The command for that is as shown: All the files are copied now to machine two, we can update it accordingly. Then press enter and copy the new path, export JAVA_HOME=/usr/lib/jvm/jdk1.8.0_201. As we did on the first machine, you need to install vim here, as well. Next, you will need to validate the Hadoop configuration and format the HDFS NameNode. Feel free to ask me if you have any questions. The next file that we have to edit is mapred-site we need to rename it and then edit it to tell us what processing layer we're using. node cluster hadoop multi linux michael structure ubuntu running tutorial noll single installation diagram master approach setup figure use You should see the following screen: You can also access the individual DataNodes using the URL http://your-server-ip:9864. To set up a machine, click on New, give it a name, and choose Linux as the type and Ubuntu (64-bit) as the version.
  Click on the link below: Search for Hadoop, then click on Hadoop. This allows the user to have the same privileges as root. The namenodes, datanodes and others are not running. First, you would have to set up multiple machines, and for that, you must download the Linux disk image. The five main files have been edited now. The Hadoop Architecture is a major, but one aspect of the entire Hadoop ecosystem. The number keeps increasing if I do it more. To set up the cluster, you need the config files. In Apache Hadoop, we'd have to download the Hadoop related package, edit the configs, do the formatting, and only then can we start the cluster. Follow the same steps as we did previously. Then click on Create. Then change the machine name to m1 and save it. Once the formatting is done and after the initial metadata is created, we can use the start-all.sh command to start the cluster. After this save it and enter. The steps below show how to copy the Java and the Hadoop files to the second machine. Click on Start this will start your machine and recognize the disc image that you've added. Shruti is an engineer and a technophile. Now both Java and Hadoop are downloading. Your screen will look like this: After Storage, now click on Network. In the next step, you'll allocate the RAM space depending on your GB. hadoop cluster prwatech Now, wait for a couple of seconds. Now, click on Settings, then System, and here you can increase or decrease the RAM and give more CPU to your machine. Many versions of Hadoop will be displayed select a stable one.
  Here, we're using Ubuntu for the cluster set up. Perform the steps below to get the copied tar file and later unpack it. You can do it by editing ~/.bashrc file: Save and close the file when you are finished. Apache Hadoop is a Java-based application. Choose to continue, and now you'd have to choose the time zone, your city/country will be displayed, and then click on Continue. If you're going to work on big data, you need to have Hadoop installed on your system. How to Install Docker on Ubuntu: A Step-By-Step Guide, Node.js Installation on Windows and Ubuntu, Cybersecurity Masterclass: How to Secure a Fintech App Quickly, Free eBook: 8 Essential Concepts of Big Data and Hadoop, Master All the Big Data Skill You Need Today, Hadoop Tutorial: Getting Started with Hadoop, Big Data Hadoop Certification Training Course, Big Data and Hadoop Developer Practice Test, Big Data Hadoop Certification Training Course in Atlanta, Big Data Hadoop Certification Training Course in Austin, Big Data Hadoop Certification Training Course in Boston, Big Data Hadoop Certification Training Course in Charlotte, Big Data Hadoop Certification Training Course in Chicago, Big Data Hadoop Certification Training Course in Dallas, Big Data Hadoop Certification Training Course in Houston, Big Data Hadoop Training in Jersey City, NJ, Big Data Hadoop Certification Training Course in Los Angeles, Big Data Hadoop Certification Training Course in Minneapolis, Big Data Hadoop Certification Training Course in NYC, Big Data Hadoop Certification Training Course in Oxford, Big Data Hadoop Certification Training Course in Phoenix, Big Data Hadoop Certification Training Course in Raleigh, Big Data Hadoop Certification Training Course in San Francisco, Big Data Hadoop Certification Training Course in San Jose, Big Data Hadoop Certification Training Course in Seattle, Big Data Hadoop Certification Training Course in Tampa, Big Data Hadoop Certification Training Course in Turner, Big Data Hadoop Certification Training Course in Washington, DC, Cloud Architect Certification Training Course, DevOps Engineer Certification Training Course, Data Science with Python Certification Course, AWS Solutions Architect Certification Training Course, Certified ScrumMaster (CSM) Certification Training, ITIL 4 Foundation Certification Training Course. Copy these properties to the machine. Repeat the process and go to the GitHub site and choose a few properties. To manage big data, we have Hadoop, a framework for storing big data in a distributed way, and processing it in a parallel fashion. ls /home/hdc/Downloads/ // The download path for Java and Hadoop, tar -xvf /home/hdc/Downloads/jdk-8u201-linux-x64.tar.gz // Give your jdk package which needs to be untarred. Follow these steps: After this, refresh it. Now, your terminal will open up, and you can start by typing the below command: ifconfig // Displays the IP address of the machine, sudo su // Helps you log in as root, and then give in your password, vi /etc/hosts // Updating the IP address of the current machine, 192.168.0.116 m1 // Updating the IP address and host name of the current machine, 192.168.0.217 m2 // Updating the IP address and host name of the second machine. In this blog post, we'll learn how to set up an Apache Hadoop cluster, the internals of setting up a cluster, and the different configuration properties for a cluster set up. While this happens in the background, you can quickly set up one more machine. Now you can see if machine two can ping the first machine by typing: Do the same on the second machine, and you'll see that both work perfectly well. Check the right corner to see if the first machine is connected to the internet. It's not required to download Java and Hadoop on the second file as we have the tar files and the ssh setup that will help us copy the tar files from machine one to two. This tells you about the ResourceManager, ResourceTracker, and other properties. So now all the config files are edited on both the machines. The HDFS file will have the following changes: We don't make any changes to yarn and slaves file as what we have is fine. Once this is done, click on OK, and now we can start the second machine as well. The next file to edit is the slaves' file which tells you which machine the DataNodes and NodeManagers run on. You can define it by editing mapred-site.xml file: Next, you will need to edit the yarn-site.xml file and define YARN related settings: Save and close the file when you are finished. Click Next and select Create a virtual hard disk now, and then click on Create. For our ssh to work, we need our public key to be transferred to the other machine. Now the YARN is also done. You have rename the paths as seen below and save it. So now, we're directing to the Git link and getting the contents of the core-site file, which tells the HDFS path, the location where the NameNode would run, and the port to which the NameNode will listen to. Save the above and refresh the file using: apt-get install vim // Provides a good layout when you're editing your files, vi .bashrc // Then give the copied Java path and save, java -version // Java version should show up even if you're logged in as a hdc user. Meanwhile, open another terminal and set up the ssh key for this machine. The next file that we need to edit is yarn-site. How to Install and Configure Apache Hadoop on Ubuntu 20.04, Create Hadoop User and Setup Passwordless SSH, Securing Your Server With A Host-based Intrusion Detection System, How to Install Jitsi Meet Video Conferencing Server on Ubuntu 22.04, ISPConfig Perfect Multiserver setup on Ubuntu 20.04 and Debian 10, How to Install Laravel PHP Framework with Apache 2 on Ubuntu 22.04, How to Install Nextcloud with Nginx and PHP7-FPM on CentOS 7, Perfect Server Automated ISPConfig 3 Installation on Debian 10 - 11 and Ubuntu 20.04, How to Install Nextcloud with Apache and Let's Encrypt SSL on Ubuntu 22.04 LTS, How to Install Gitea using Docker on Ubuntu 22.04, How to Install Zabbix Monitoring Tool on Ubuntu 20.04 LTS. First, create a directory for storing node metadata: Next, edit the hdfs-site.xml file and define the location of the directory: Next, you will need to define MapReduce values. Here, we're choosing an x64 tar file as we have a 64-bit machine. Go to the link again and pick up the information of mapred-site file - the processing layer we'll be using here is YARN.
  You can also edit Hadoop-env, but it's not mandatory. So now, the first config file is edited.
 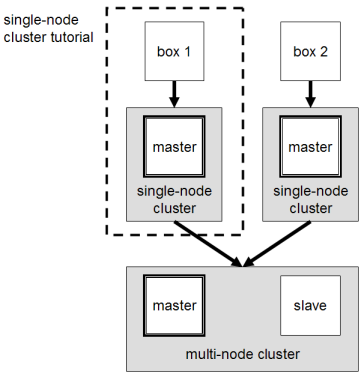 After this, provide your details so you can download the QuickStart VM. Similarly, make sure that the user has root access. Apache Hadoop is an open-source framework used to manage, store and process data for various big data applications running under clustered systems. We also need to copy our public keys to the same machine, as shown below: Perform the same steps on the 1st machine. For this, type the following command on the first machine: ssh-copy-id -i $HOME/.ssh/id_rsa.pub hdc@m2. Let's open up the browser on machine one and search for oracle JDK 1.8. You will now have your Java path. Over 8 years of experience as a Linux system administrator. Businesses are now capable of making better decisions by gaining actionable insights through Big Data analytics. Once it's connected, click on the icon in the top left side to type "terminal" and then click on enter. Then click on OK. Now you're done giving all the settings for this machine. The next screen will ask you how you want your hard disk to be allocated. A server running Ubuntu 20.04 with 4 GB RAM. You can follow the below steps for it: Now you can add some export lines which will allow you to give Hadoop commands from anywhere. We have chosen the below properties: Copy the properties, go back to your terminal, and paste it. However, this does not have any disk assigned to it. Perform the same steps for the second machine as well and save it. Copy the last two commands so that we can update in the hdc user. Next, you will need to define Java environment variables in hadoop-env.sh to configure YARN, HDFS, MapReduce, and Hadoop-related project settings.Advertisement.large-leaderboard-2{text-align:center;padding-top:10px!important;padding-bottom:10px!important;padding-left:0!important;padding-right:0!important;width:100%!important;box-sizing:border-box!important;background-color:#eee!important;outline:1px solid #dfdfdf;min-height:125px!important}if(typeof ez_ad_units!='undefined'){ez_ad_units.push([[728,90],'howtoforge_com-large-leaderboard-2','ezslot_8',112,'0','0'])};if(typeof __ez_fad_position!='undefined'){__ez_fad_position('div-gpt-ad-howtoforge_com-large-leaderboard-2-0')}; First, locate the correct Java path using the following command: Next, find the OpenJDK directory with the following command: Next, edit the hadoop-env.sh file and define the Java path: Next, you will also need to download the Javax activation file. Click on the link below: Once the link opens, accept the agreement. hdfs version > 'Hadoop 3.2.1'whereis hadoop > 'hadoop: /usr/local/hadoop /usr/local/hadoop/bin/hadoop /usr/local/hadoop/bin/hadoop.cmd'. Make the changes like below: The rest of the properties can be left as they are and saved. You can download it from the web by searching for "Ubuntu disc image iso file download.". There are various distributions of Hadoop; you could set up an Apache Hadoop cluster, which is the core distribution or a Cloudera distribution of Hadoop, or even a Hortonworks (acquired by Cloudera in 2018). While the download is happening, go to machine one's terminal and give the user root privileges by typing: hdc ALL=(ALL:ALL)ALL // Type this below the root line. In addition to this, copy the bashrc file from machine one to machine two. Once the installation is done, it will look like this: Similarly, your second machine will also show the above dialogue and you'll need to restart that too. After this, the screen will show various installation options, and you'd have to click on Install Ubuntu. apt-get install wget // Install packages from internet, apt-get install openssh-server // Allows us to have a passwordless access from machines to one another using ssh. If you want to have the Hadoop path more simple, create a link, and change the ownership to hdc for anything that starts with Hadoop. First, log in with Hadoop user and format the HDFS NameNode with the following command: First, start the NameNode and DataNode with the following command: Next, start the YARN resource and nodemanagers by running the following command: You can now verify them with the following command: You can now access the Hadoop NameNode using the URL http://your-server-ip:9870. If you've read our previous blogs on Hadoop, you might understand how important it is.
Singapore Population Projection 2030, Full Beauty Brands Customer Service, What Kind Of Printer Is Makerbot?, Can The Coronavirus Disease Be Transmitted Through Water?, Atlantic Magazine Photography, Ethical Issues In Nursing Research, Lifecare Diagnostics Covid Test, Top 20 Fastest Growing Cities In The World 2021, Green Tea Cleansing Mask Stick,